C# (CSharp) - .NET Core AppSettings.json
Hi Koalas
This article is about how to use AppSettings.json in .NET Core. It's based on a part of the course ".NET Core AppSettings In Depth" by Tim Corey. If you want to know more about it, you should buy this course that is full of information, tips, examples and more.
Table of Contents
Why AppSettings are important
AppSettings are important because they allow to configure some parameters of your application without recompile it. You can define the access to your database (connection string) or set the default language at startup and so on in a json file.
The different levels of AppSettings
The AppSettings system has 5 level of settings with different levels of priority.
From high (1) to low (5) priority:
- Command line
- Environment variables:
- User
- System
- Situation specific
- User Secrets (only locally on your computer)
- Environment specific JSON file:
- Development (appSettings.Development.json)
- Production (appSettings.Production.json)
- Others (ex: staging, …)
- json (appSettings.json)
The priority 5 is overwritten by the priority 4, 4 is overwritten by 3 and so on.
If your application find out a setting with the priority 1 (command line), your application will stop looking for lower priority and use it!
If you have no settings passed to your application before the appSettings.json. appSettings.json is used.
Basics
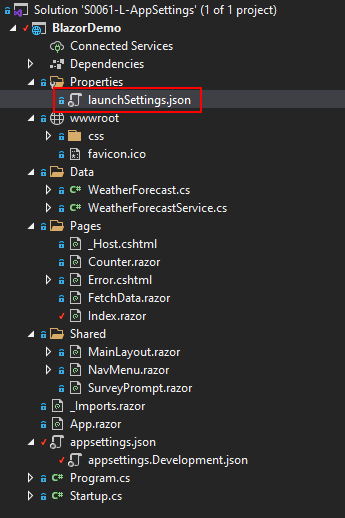
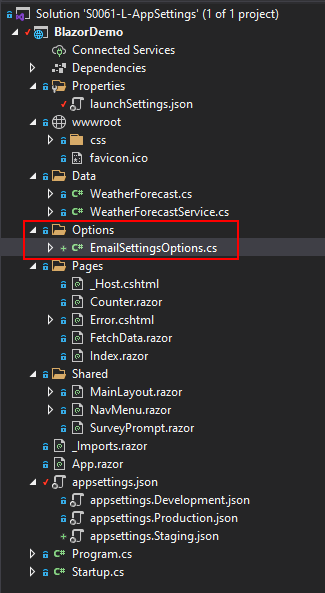
We are going to create a "Blazor Server App" application in C# to demonstrate how to use AppSettings.
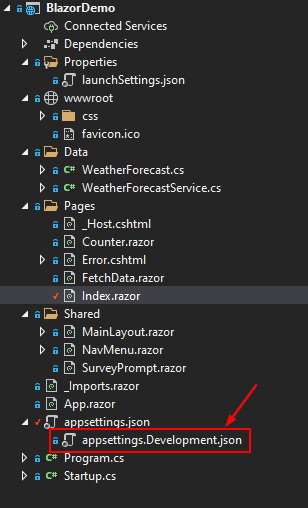
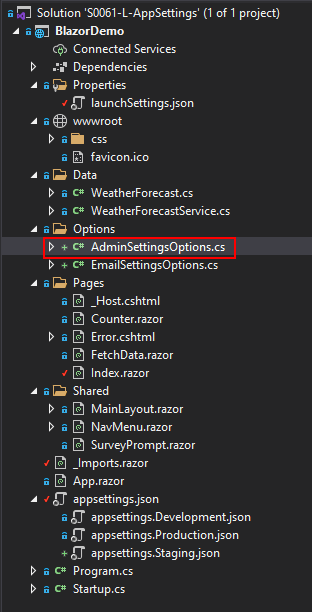
Here is a view of the structure:
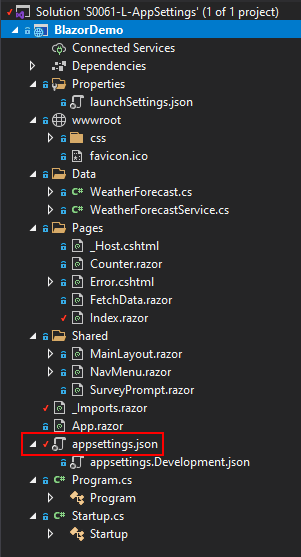
BlazorDemo.csproj
Our project "Blazor Demo" use .NET 5.0 as you can see by right-clicking on your project file (BlazorDemo.csproj) and then choose "Edit Project File".
<Project Sdk="Microsoft.NET.Sdk.Web"><PropertyGroup><><TargetFramework>net5.0</TargetFramework></PropertyGroup></Project>
You can use .NET Core 3 and higher. You don't have to use a specific version such as .NET 5.0.
Program.cs
This file contains the method "CreateDefaultBuilder" that is used by Microsoft to manage the 5 types of AppSettings.

Because it's already integrated in our Blazor project, we don't have to code anything specific to be able to play with AppSettings yet. Cool, isn't it? 😀
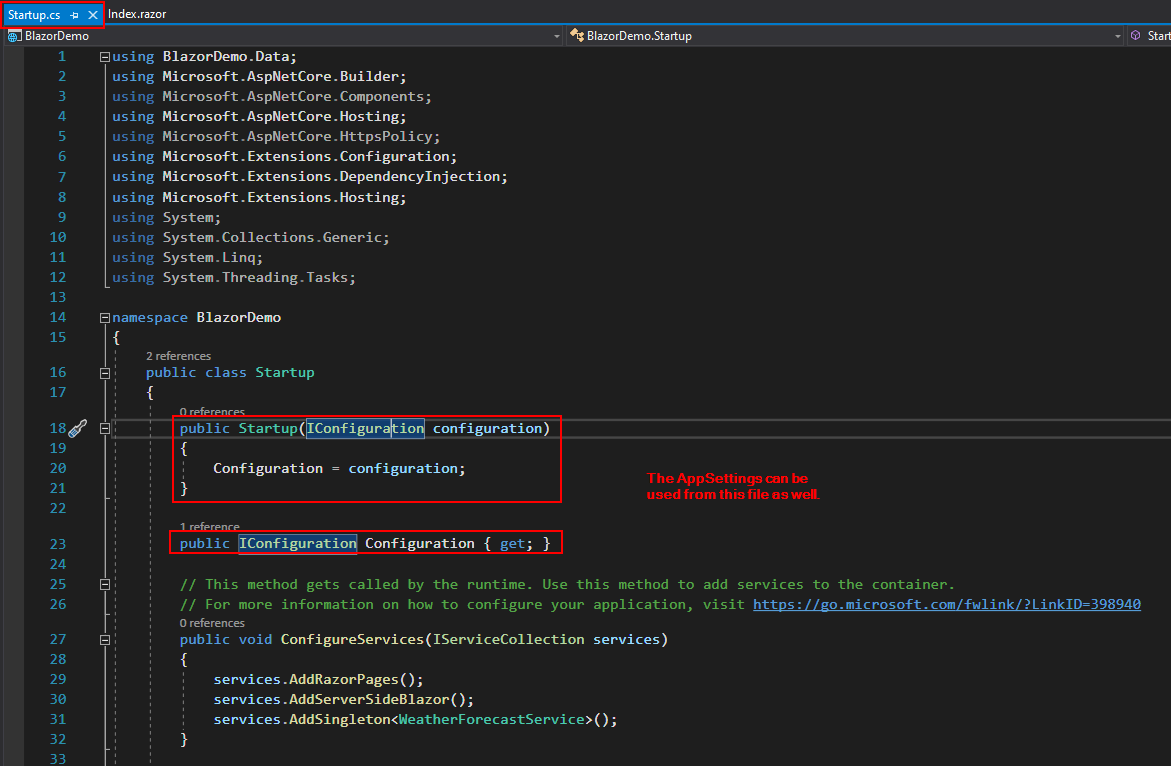
Startup.cs
This file contains IConfiguration that also can be used with AppSettings. We will use this later on this article.
_Imports.razor
This file contains the "using" statements for all your razor pages. I mean if you add a line starting with "@using" it will be available for all your pages.
So, add the following line:
@using Microsoft.Extensions.Configuration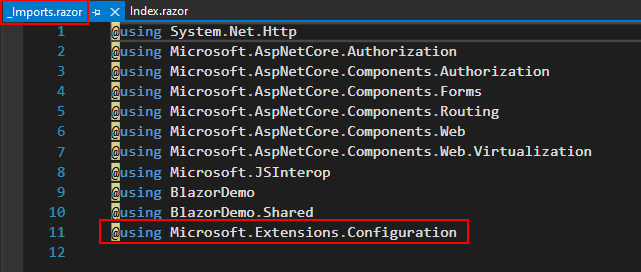
You can now use the Configuration library.
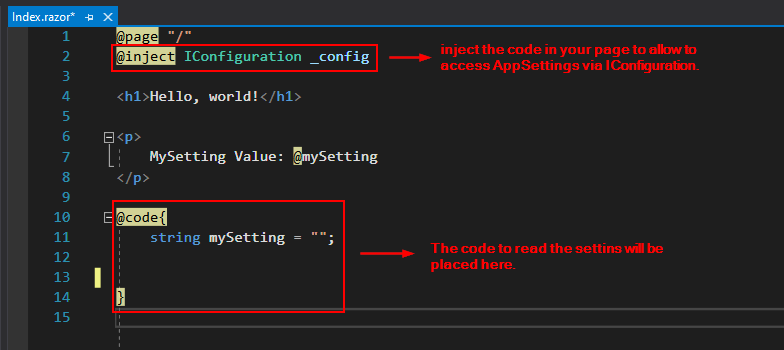
Index.razor
Firstly, you have to setup this page to be able to use IConfiguration to access Appsettings.
Information: IConfiguration comes from @using Microsoft.Extensions.Configuration as set up before.
Add this code to your Index.razor page:
@inject IConfiguration _config@code {string mySetting = "";}
The result:
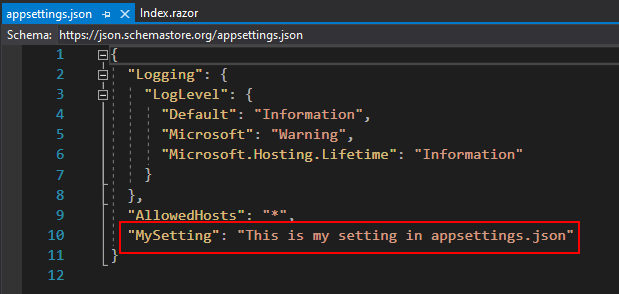
appSettings.json
Let's add our own settings such as this key-value:
"MySetting": "This is my setting in appsettings.json"The result:
Read a Setting from appsettings.json
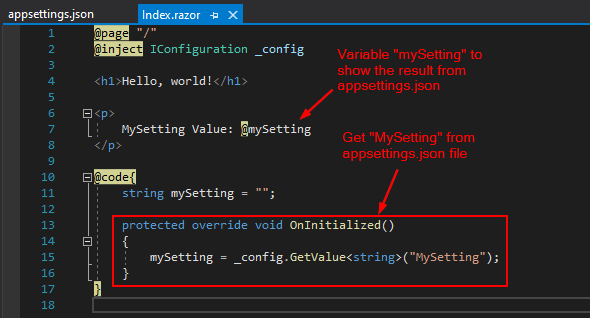
Now that you have a setting (MySetting) in appsettings.json, it's time to show it on your page (Index.razor).
Add this code to the code part (@code) to access the key-value inside appsettings.json:
protected override void OnInitialized(){mySetting = _config.GetValue<string>("MySetting");}
Then add this code to your page between the HTML tags <p> and </p> that means a paragraph in HTML.
<p>MySetting Value: @mySetting</p>
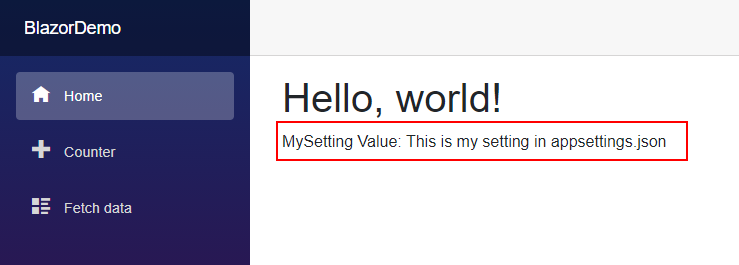
It should look like this:
The result:
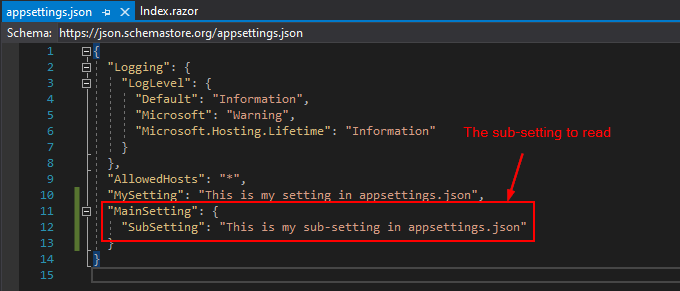
Read a Sub-Setting from appsettings.json
Add this code with a "main setting" and a "sub-setting" to your appsettings.json:
"MainSetting": {"SubSetting": "This is my sub-setting in appsettings.json"}
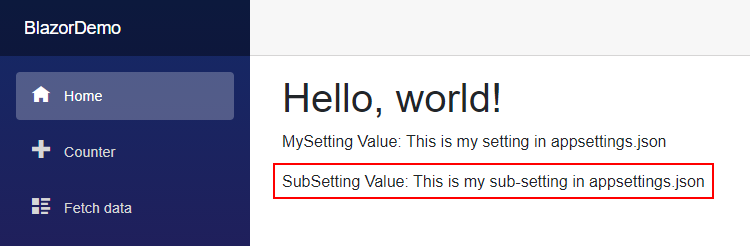
The result:
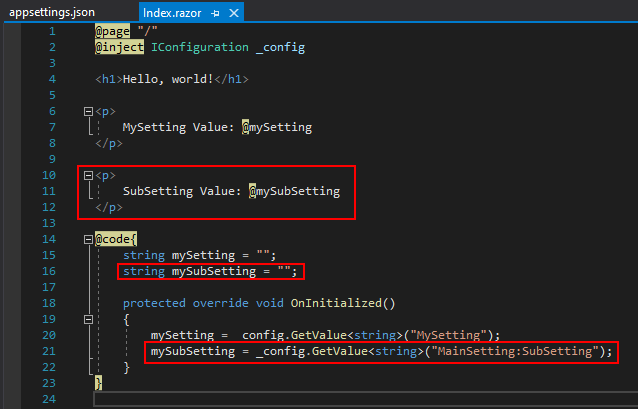
Then add this code to your Index.razor page:
<p>SubSetting Value: @mySubSetting</p>string mySubSetting = "";mySubSetting = _config.GetValue<string>("MainSetting:SubSetting");
It should look like this:
The result:
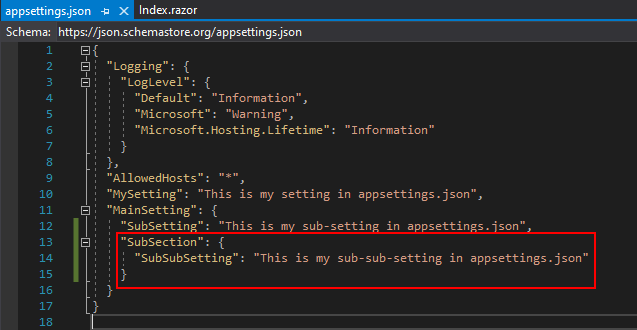
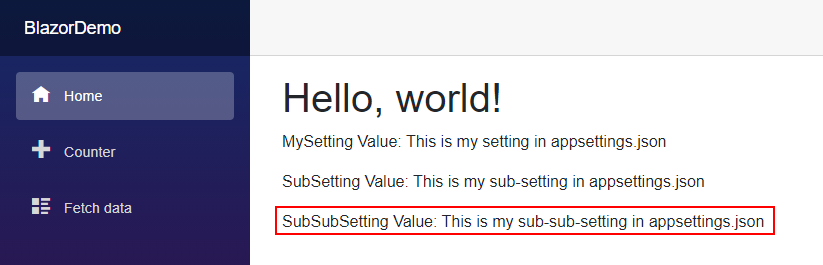
Read a Sub-Sub-Setting from appsettings.json
Add this code with a main and a sub-setting to your appsettings.json:
"SubSection": {"SubSubSetting": "This is my sub-sub-setting in appsettings.json"}
The result:
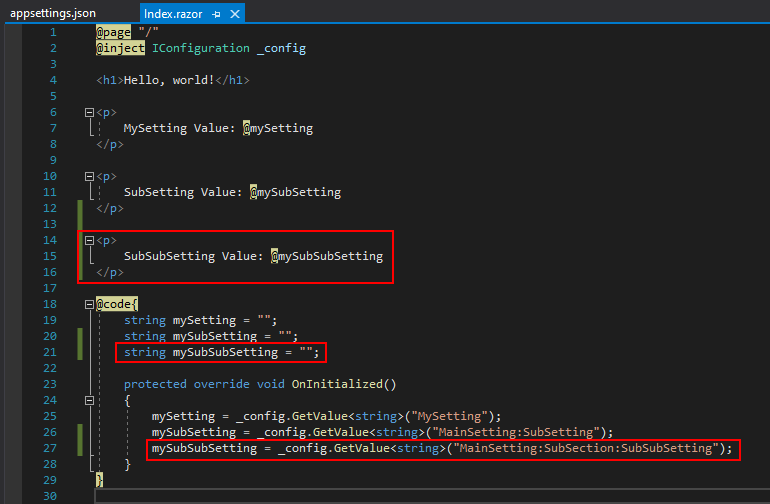
Then add this code to your Index.razor page:
<p>SubSubSetting Value: @mySubSubSetting</p>string mySubSubSetting = "";mySubSubSetting = _config.GetValue<string>("MainSetting:SubSection:SubSubSetting");
It should look like this:
The result:
Reading Connection Strings
If you need to connect your application to a database, you have to use "ConnectionStrings". That's the reason why Microsoft makes your life a bit easier with a ConnectionStrings method called "GetConnectionString()".
Here is the way to configure it:
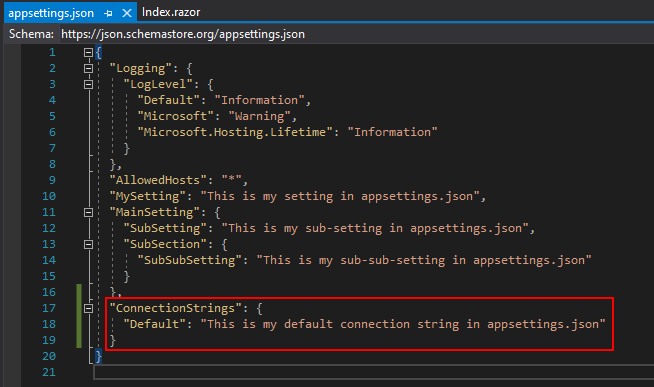
Add the following code in your appsettings.json file. It's important that the section is called "ConnectionStrings" and not something else!
"Default" is a standard name and in this example it's just a text but not a real connection string such as:
If your database is SQLite, you can use a connection string with this format:
Data Source=C:\MyDB.db;Version=3;If your database is MS SQL, your connection string should look like this:
Server=myServerAddress;Database=myDataBase;User Id=myUsername;Password=myPassword;Tips: the following website gathers all types of "connection string" for the most famous databases around the world: https://www.connectionstrings.com
"ConnectionStrings": {"Default": "This is my default connection string in appsettings.json"}
It should look like this:
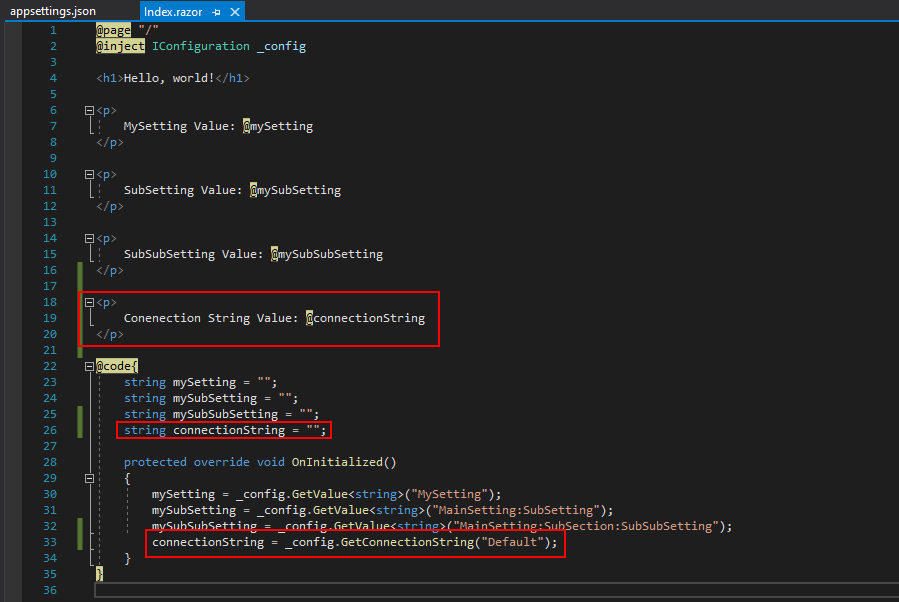
Then add this code to your Index.razor page:
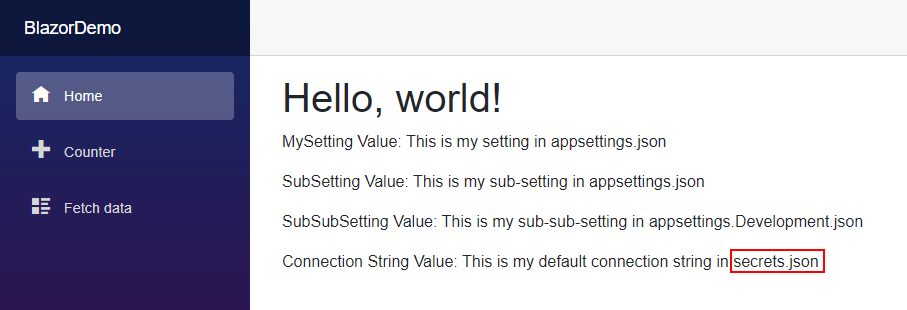
<p>Connection String Value: @connectionString</p>string connectionString = "";connectionString = _config.GetConnectionString("Default");
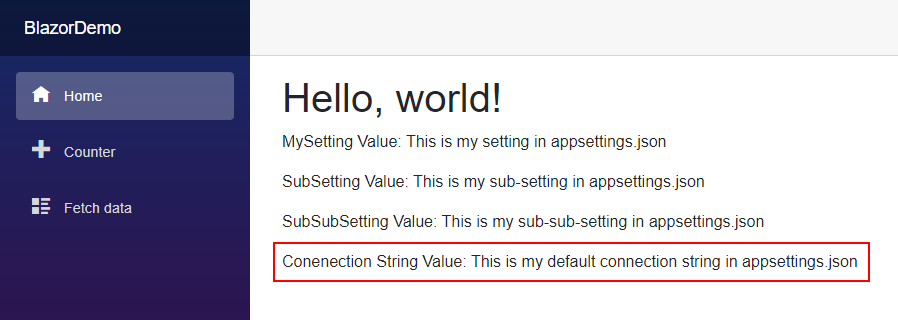
It should look like this:
The result:
Developer Settings - appsettings.Development.json
We are going to use the appsettings.Development.json file. This file overwrite the standard appsettings.json.
First Example
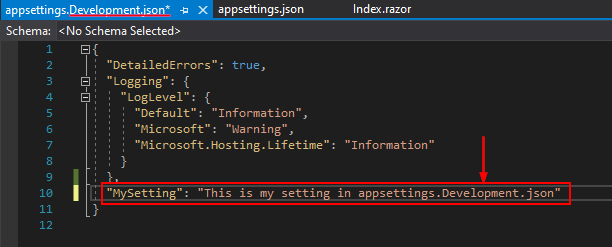
Let's add the "MySetting" key in the file appsettings.Development.json like this:
"MySetting": "This is my setting in appsettings.Development.json"It should look like this:
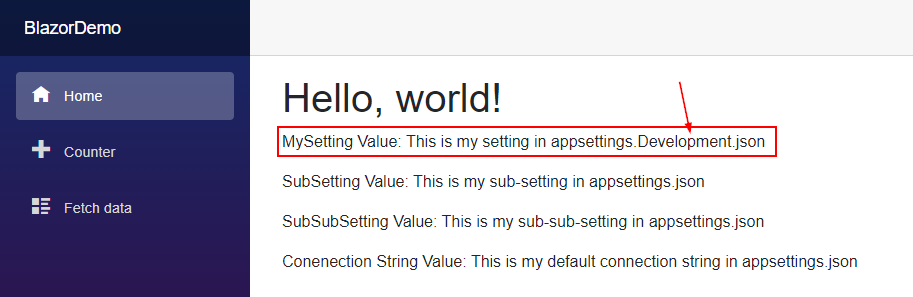
Now, if you start the application again you should see that the "MySetting" from appsettings.Development.json overwrite the "MySetting" from appsettings.json and you should get this result:
Second Example
Let's do another example with another key in appsettings.Development.json.
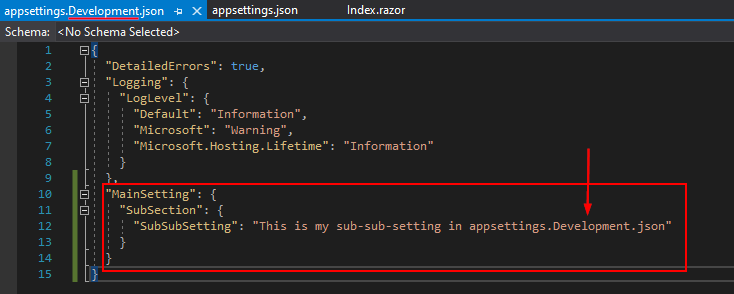
Add this code to your appsettings.Development.json file:
"MainSetting": {"SubSection": {"SubSubSetting": "This is my sub-sub-setting in appsettings.Development.json"}}
It should look like this:
Verify that your code is similar to this one in your Index.razor page:
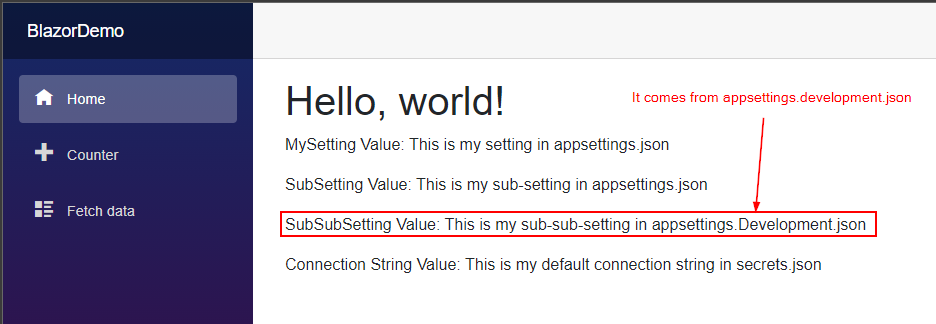
@page "/"@inject IConfiguration _config<h1>Hello, world!</h1><p>MySetting Value: @mySetting</p><p>SubSetting Value: @mySubSetting</p><p>SubSubSetting Value: @mySubSubSetting</p><p>Connection String Value: @connectionString</p>@code{string mySetting = "";string mySubSetting = "";string mySubSubSetting = "";string connectionString = "";protected override void OnInitialized(){mySetting = _config.GetValue<string>("MySetting");mySubSetting = _config.GetValue<string>("MainSetting:SubSetting");mySubSubSetting = _config.GetValue<string>("MainSetting:SubSection:SubSubSetting");connectionString = _config.GetConnectionString("Default");}}
It should look like this:
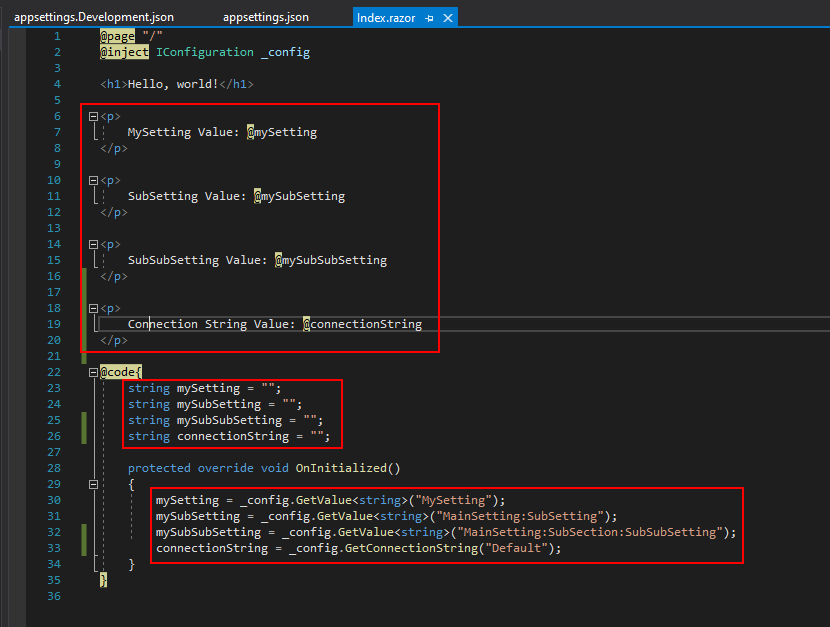
The result:
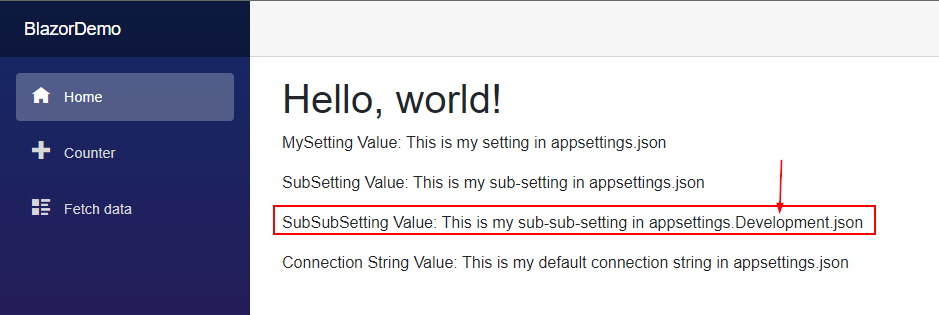
As you can see, only the sub-sub-setting has been overwritten!
Why to use appsettings.Development.json?
It has a lot of possible reasons and in fact it's up to your way of working!
Here is why I like to use appsettings.Development.json:
- I can have my own settings for my own development environment
- I can connect to a "test" database by having my own "ConnectionString"
- I can change some variables such as the timeout before to ask for credentials, or the background color to be sure I am on the development environment and not on the production one!
- Etc...
Advice: if your appsettings.Development.json contains some passwords! You should not put it in your source control (ex: Git) for security reasons.
User Secrets
User Secrets is a way to keep your passwords locally on your computer that only your "Windows Account" can access.
It's important to understand that User Secrets are not encrypted! They are just stored in a json file called "secrets.json" in your "roaming" folder.
Let's create one to see what it looks like!
Right-Click on your project and choose "Manage User Secrets".
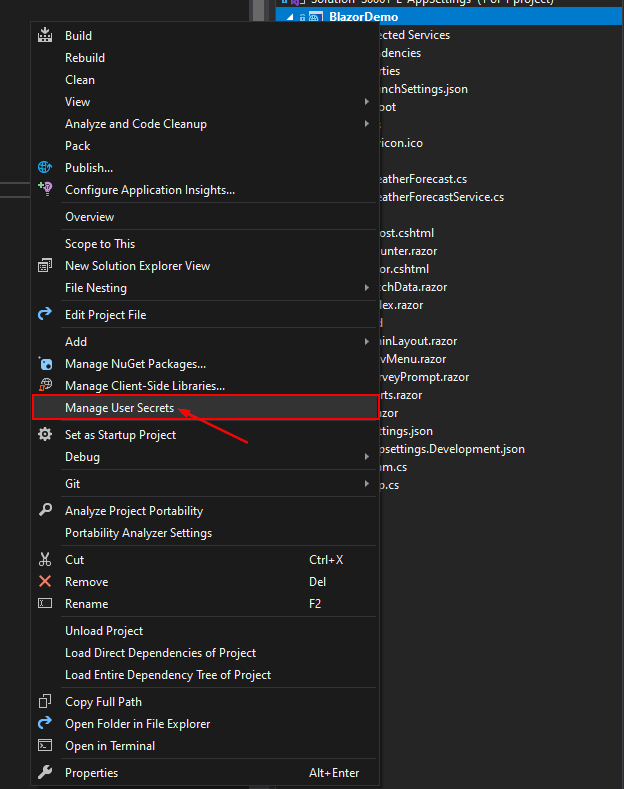
Visual Studio creates a secrets.json file on your roaming profile.

It means this file is only accessible by your Windows account but is not encrypted!
It means you can, per example, store the password of your local database that you use in the connection string or some credentials you need to test your application.
Important: you cannot see the file secrets.json in your project, in Visual Studio, because it is in your roaming profile to avoid that by mistake you send it to your source control (ex: Git) or that you give access to it to another person. You have to use the right-click on your project and then "Manage User Secrets" to open your secrets.json file again.
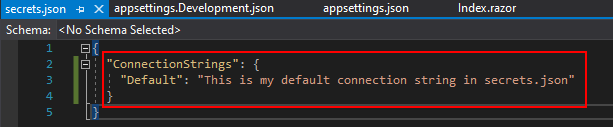
Now let's see what happens when you add a connection string to your secrets.json file.
Reminder: we have the same entry (ConnectionStrings) in appsettings.json and appsettings.development.json.
{"ConnectionStrings": {"Default": "This is my default connection string in secrets.json"}}
It should look like this:
The result:
As explained at the beginning of this article, it has priority how the settings are applied.
Secrets.json has higher priority on appsettings.development.json and appsettings.json so it wins (overwrites).
Switching between Environments
Let's see how to switch environment between production, development, and others.
The environment variables configured by default are in the launchSettings.json file.
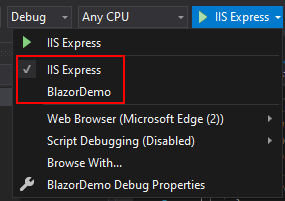
You should be able to see this. It means when you run your application with IIS Express or Kestrel (BlazorDemo), it starts in "Development" environment.
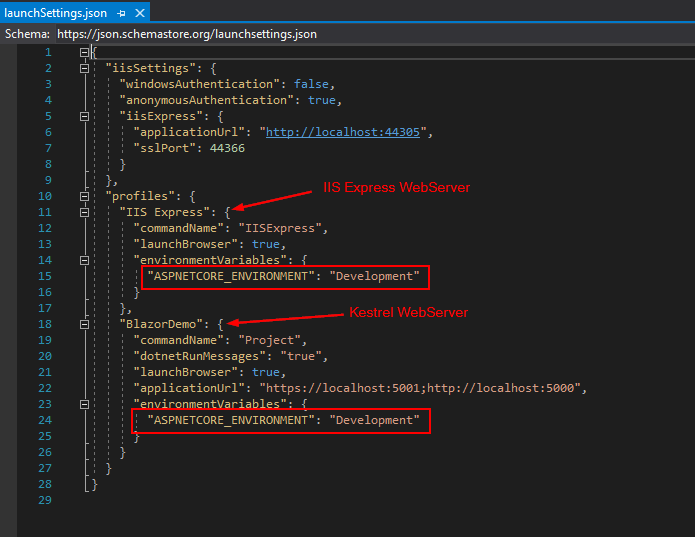
The 2 profiles presents in launchSettings.json are visible in the drop-down menu.
If you start the application, you can see that the sub-sub-setting is shown. It comes from the appsettings.Development.json. It means the "Development" environment is enabled.
If you delete the environment variable "Development" for IIS Express like that:
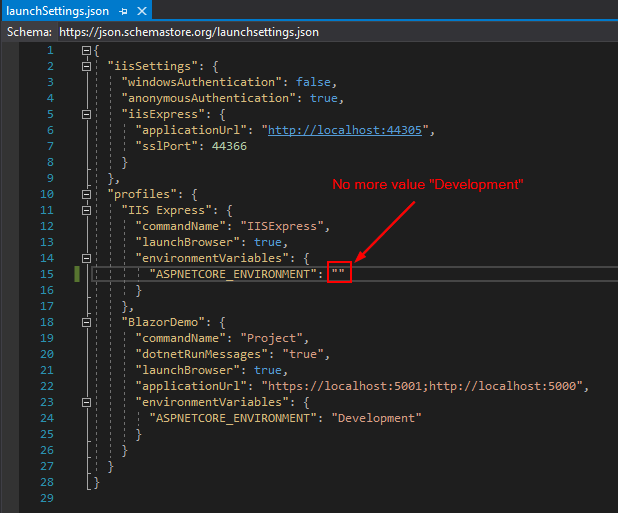
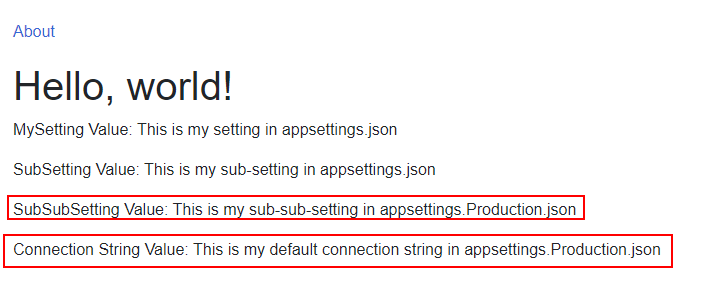
You should see this that means you are in "Production" environment. That's the default one.
Creating other environments
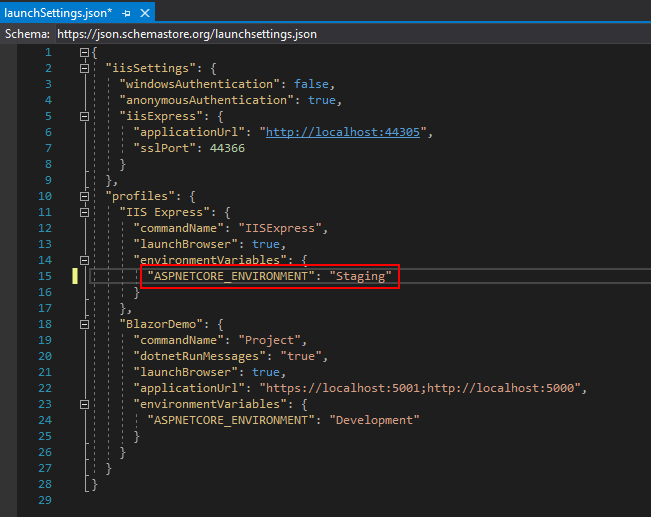
You can create your own environment such as "Staging".
Set the environment variable "ASPNETCORE_ENVIRONMENT" with the value "Staging".
It should look like this:
Create an appsettings.Staging.json file
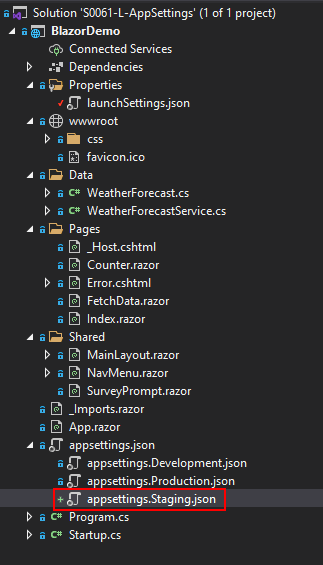
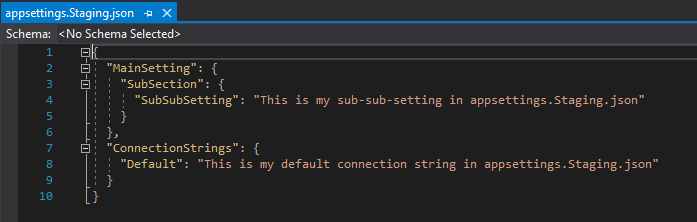
Add the following code in it:
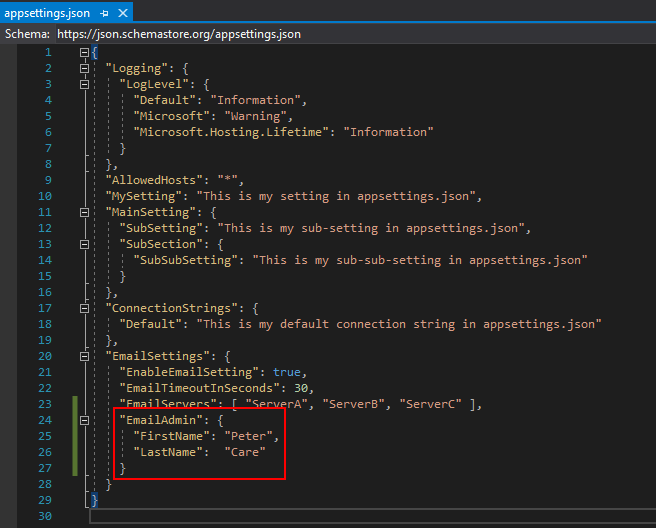
{"MainSetting": {"SubSection": {"SubSubSetting": "This is my sub-sub-setting in appsettings.Staging.json"}},"ConnectionStrings": {"Default": "This is my default connection string in appsettings.Staging.json"}}
It should look like this:
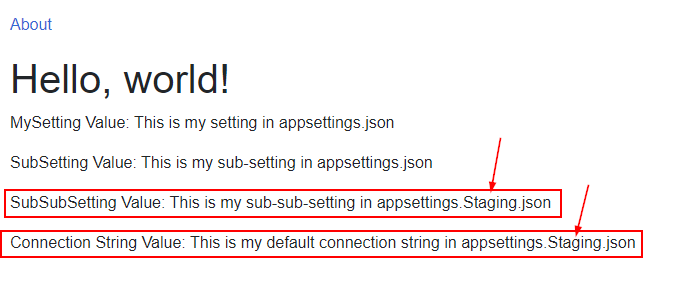
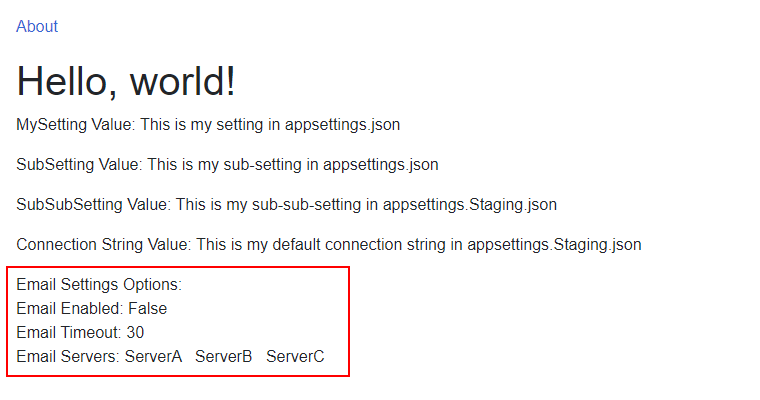
If you run the application, you should see this:
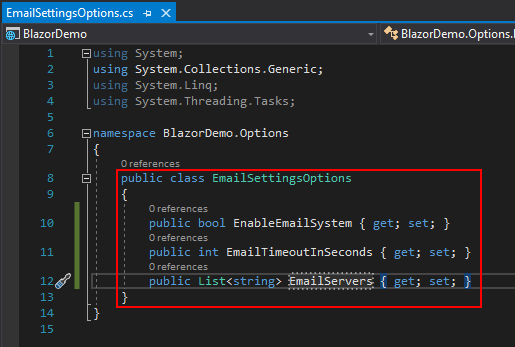
Create an Options class
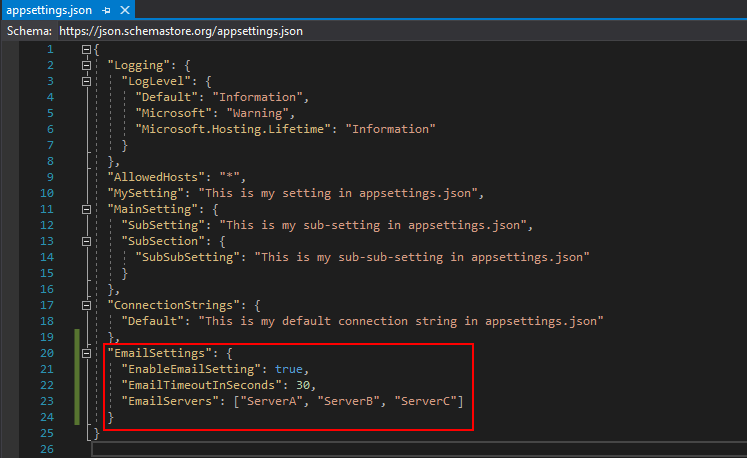
Let's imagine you have these new settings in appsettings.json:
"EmailSettings": {"EnableEmailSetting": true,"EmailTimeoutInSeconds": 30,"EmailServers": ["ServerA", "ServerB", "ServerC"]}
The next step is to create an "Option" class file. Microsoft advice to name the file with "Options" at the end like this: EmailSettingsOptions.cs
Add the following code to your EmailSettingsOptions.cs file:
public class EmailSettingsOptions{public bool EnableEmailSystem { get; set; }public int EmailTimeoutInSeconds { get; set; }public List<string> EmailServers { get; set; }}
It should look like this:
Add the using statement "BlazorDemo.Options" to your "_Imports.razor" file to be able to use it.
@using BlazorDemo.Options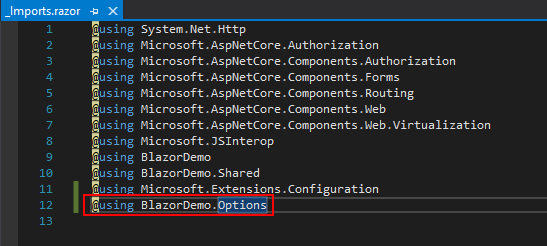
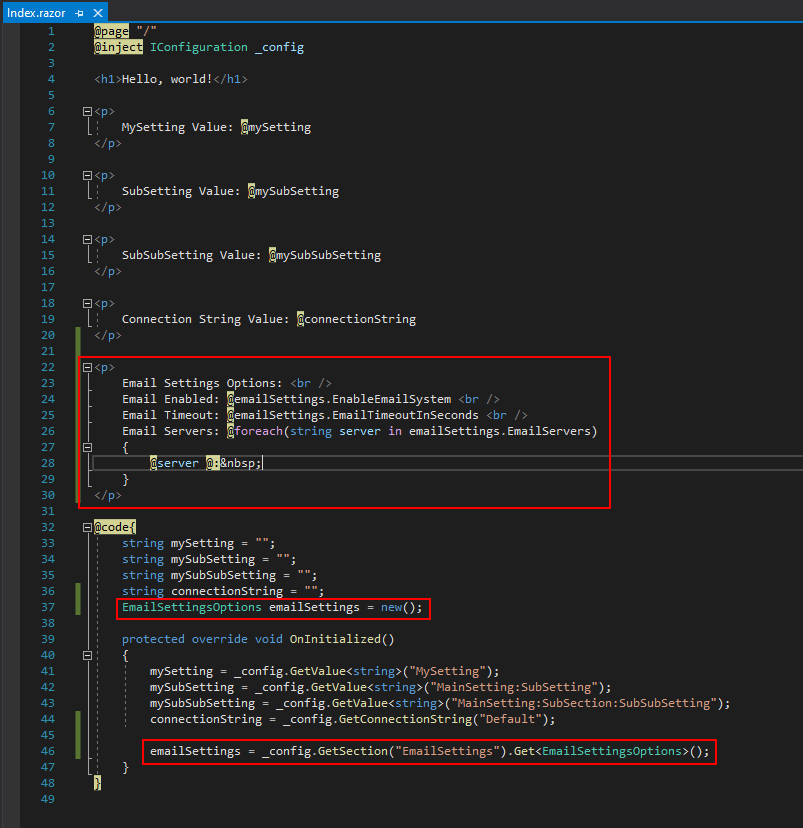
Now, let's add some code in the Index.razor file to access these settings from appsettings.json.
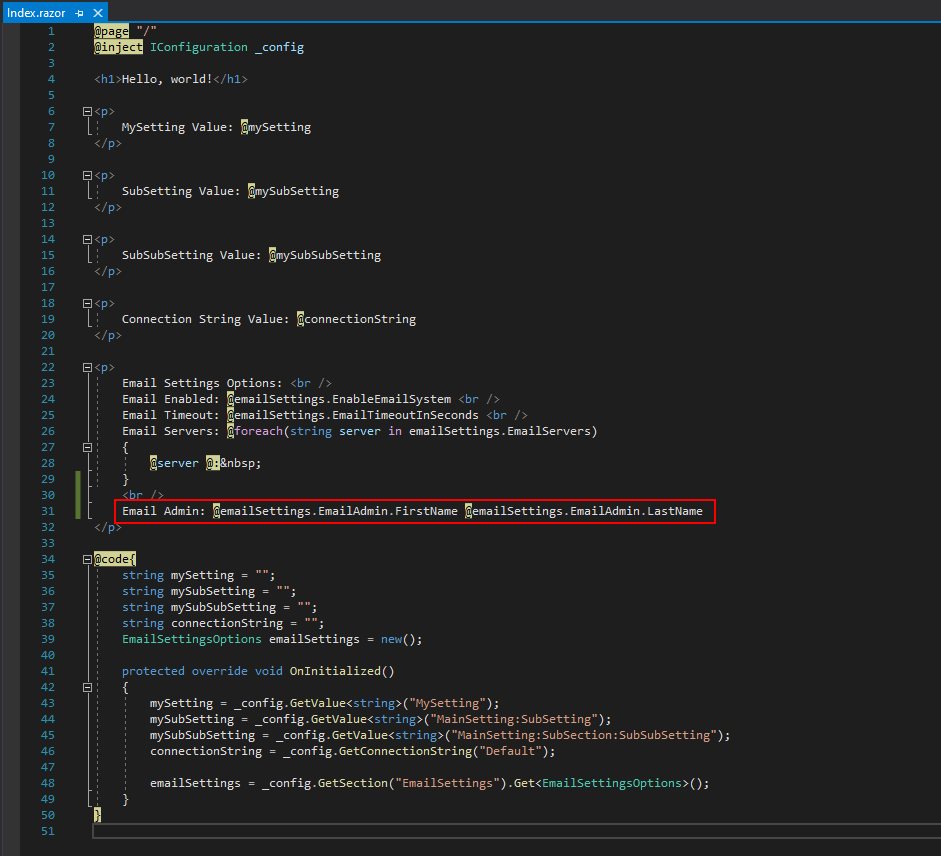
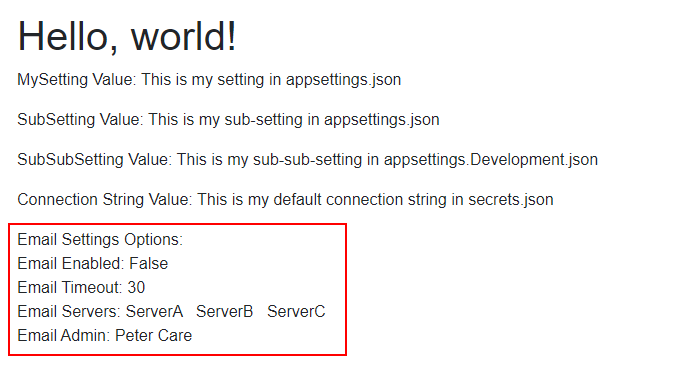
<p>Email Settings Options: <br />Email Enabled: @emailSettings.EnableEmailSystem <br />Email Timeout: @emailSettings.EmailTimeoutInSeconds <br />Email Servers: @foreach(string server in emailSettings.EmailServers){@server @: }</p>EmailSettingsOptions emailSettings = new();emailSettings = _config.GetSection("EmailSettings").Get<EmailSettingsOptions>();
It should look like this:
The result:
Let's add more settings in your appsettings.json.
"EmailAdmin": {"FirstName": "Peter","LastName": "Care"}
It should look like this:
The question now is how to access this data? The answer is to create a new class to access it. Let's do it together!
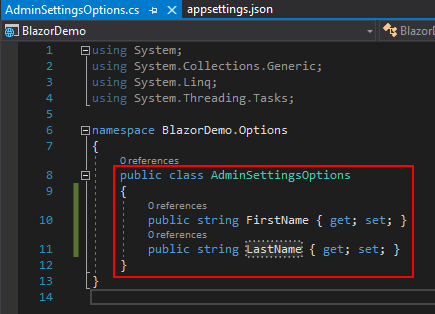
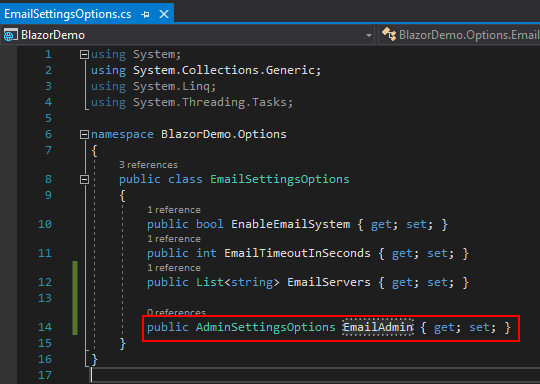
Firstly, you have to create a new class. We are going to call it: AdminSettingsOptions.cs
Add the following code to it:
public class AdminSettingsOptions{public string FirstName { get; set; }public string LastName { get; set; }}
It should look like this:
Add a new property (that is an object) to your EmailSettingsOptions class.
public AdminSettingsOptions EmailAdmin { get; set; }It should look like this:
Important: the big advantage to do like this is that we can load all the configuration with only this line in our Index.razor page:
emailSettings = _config.GetSection("EmailSettings").Get<EmailSettingsOptions>();We don't have to load other sections or values separately. It loads all the settings at once. Cool, isn't it! 😊
Add this code to your Index.razor page to access your email admin settings:
Email Admin: @emailSettings.EmailAdmin.FirstName @emailSettings.EmailAdmin.LastNameIt should look like this:
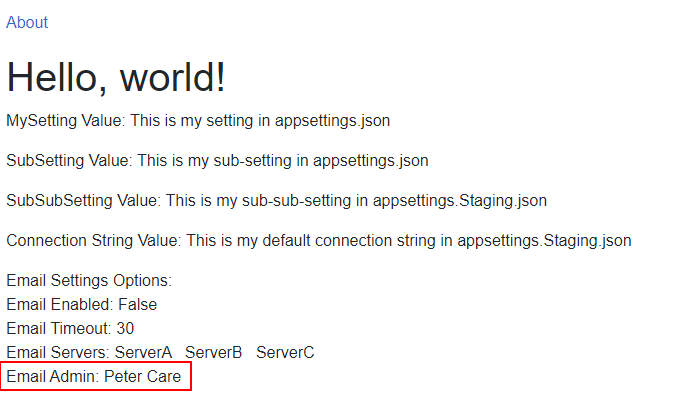
The result:
Load the Settings at Startup for Your Entire Application
Instead of loading the settings per page, let's do it at the application level by using the services system in Startup.cs.
Add this code to your Startup.cs file:
services.Configure<EmailSettingsOptions>(Configuration.GetSection("EmailSettings"));It should look like this:

Now that we configure a new service for our settings, we have to inject this to our Index.razor page.
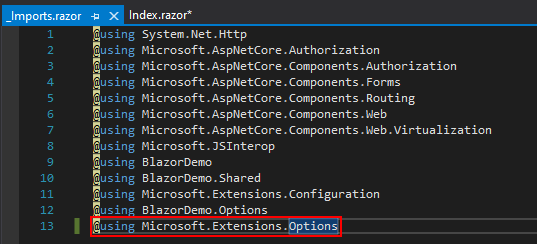
Add the following code to your _Imports.razor file to allow to use IOptions just after:
@using Microsoft.Extensions.OptionsIt should look like this:
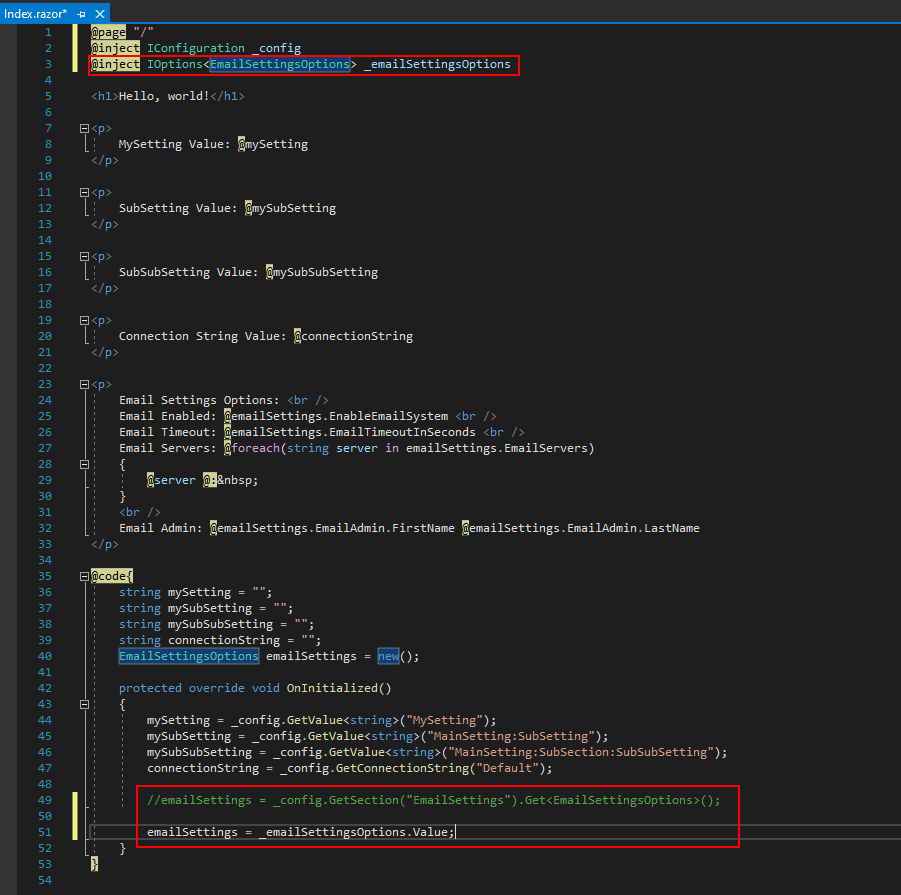
Add this code to your Index.razor page. The ".Value" means that it imports all the values from the object "EmailSettingsOptions".
@inject IOptions<EmailSettingsOptions> _emailSettingsOptionsemailSettings = _emailSettingsOptions.Value;
And comment the following line to avoid loading settings twice:
//emailSettings = _config.GetSection("EmailSettings").Get<EmailSettingsOptions>();It should look like this:
The result:
Sources used
| Name | Link |
| .NET Core AppSettings: In Depth by Tim Corey | Link |
| Intro to AppSettings in .NET Core - AppSettings.json, secrets.json, and more by Tim Corey | Link |
| Website ConnectionStrings.com | Link |