C# (CSharp) - Windows Forms Best Practices
Hello koalas
This post is about a list of "Best Practices" to learn how to make your Windows Forms (WinForms) Application more attractive.
Table of Contents
Why would you want to use Windows Forms in 2021?
Here is a list of reasons why people would continue to use Windows Forms in 2021:
- People invested a lot of energy and money in Windows Forms since 2002
- It has a lot of applications using this technology around the World
- It has a lot of companies working with WinForms applications that cannot be migrate to other technologies right now (cost, time, and/or resources)
- It has a lot of information online about Windows Forms
- The technology is mature and stable
- Windows Forms continues to be developed by Microsoft in 2021 (.NET 5.0 and upper)
- Many commercial libraries have been developed for Windows Forms
- Etc.
Windows Forms evolves
WinForms continues to evolve along the years. Of course it is not THE technology with the big hype right now but it's still a good one. Especially since Microsoft decided to migrate WinForms to .NET Core and made it "Open Source". The official repository is available at this address: https://github.com/dotnet/winforms.
Windows Forms also follows the trends by being mixed with different methods of development such as:
- Test Driven Development (TDD)
- Clean Code
- The SOLID principles
You can use WinForms with other elements of .NET such as:
- LINQ
- Async-Await
- F#
Naming Convention
It is important to choose a naming convention before to start your project.
Here are some links to help you to find out what is more suitable for you:
https://docs.microsoft.com/en-us/dotnet/standard/design-guidelines/capitalization-conventions
http://danderson.io/code/c-developer-guidelines/
I chose to name my Form Controls like that:
| Form Control | Example of name |
| Button | ExitButton |
| CheckBox | YesCheckBox |
| Label | FirstnameLabel |
| ListBox | MusicListBox |
| RadioButton | GreenRadioButton |
| TextBox | MessageTextBox |
| ComboBox | CountryComboBox |
| Etc ... |
As you can see I use this principle: A Word + Control Type (same as it's written in Visual Studio).
Form.cs and Form.Designer.cs
When you start to use Windows Forms, you often wonder why there are 2 files with code. It has:
- Form.cs
- Form.Designer.cs
Form.cs contains the constructor with the method "InitializeComponent". It runs the code inside the file Form.Designer.cs.
Form.Designer.cs contains the code about your controls. It's important to know that this file is automatically generated by the Windows Forms Designer and shouldn't be modified by hand.
Forms.cs and Form.Designer.cs use a "Partial Class". It means both file contain a section of the "Full Class" and are combined when the application is compiled.
More details at this address: https://docs.microsoft.com/en-us/dotnet/csharp/programming-guide/classes-and-structs/partial-classes-and-methods
Anchoring
What is an Anchor?
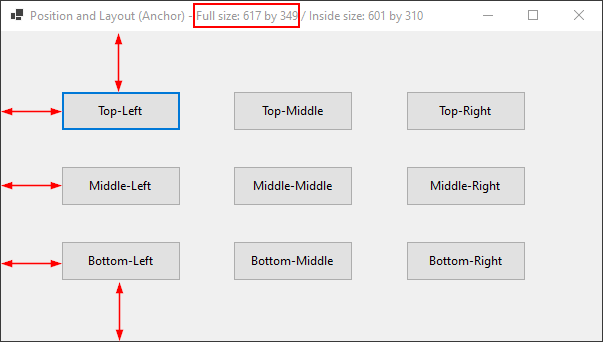
An Anchor defines the edges of the container to which a certain control is bound. When a control is anchored to an edge, the distance between the control's closest edge and the specified edge will remain constant.
An example to show it:
You can see the distances between the Controls (Buttons) and the edges of the Form. The Form has a size of 617 by 349.
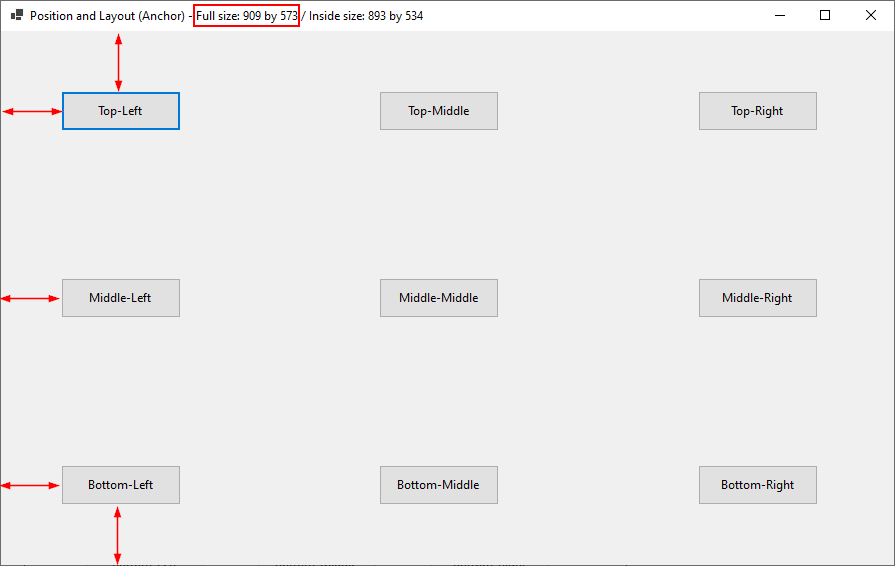
Even I increase the size of the Form, the Controls (Buttons) are still at the same distance of the edges of the Form. The Form has a size of 909 by 573.
Label Management
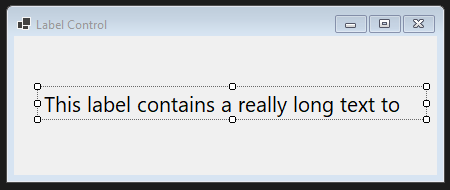
It's not always easy to manage labels when the text to show is too big! The next example shows how to deal with this problem.
My label contains a long text, too long to be shown inside the Form.

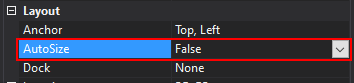
The first thing to do is to set the "AutoSize" property to "False".
Here is the result. The label is cut at the end.
Then I decide to anchor my label to the right part of my Form.
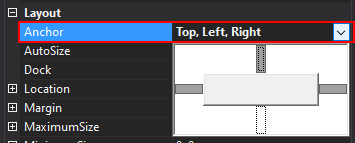
I also set the "AutoEllipsis" property to "True".

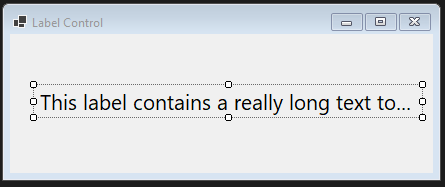
The result. Nothing changed visually about the anchor, but I can see the "triple dots" also called Ellipsis on my label.
If I increase the size of my Form, the label increase as well on the right (thanks to the anchor) and I continue to see the ellipsis because the size of my Form is still not big enough.
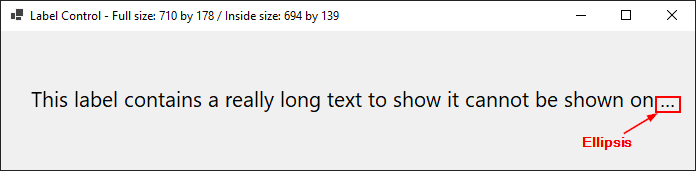
If I keep increasing the size of the Form I will see the whole text of my label and the ellipsis disappeared. Nice, isn't it? 😀

Events
An event is a user interaction with your application such as click on a button, resize a Form, and so on.
Load Event
A Load Event fires just before the Form is shown.
A Load Event is very often to populate the data used in controls.
Shown Event
A Shown Event fires just after the Form is shown.
Activated Event
An Activated Event fires when the Form gets focus.
Deactivate Event
A Deactivate Event fires when the Form loses focus.
Closing Event
A Closing Event fires just before the Form is closed.
Closed Event
A Closed Event fires just after the Form is closed.
Dialogs
A Dialog provides information to the user or requests information from the user.
A Dialog is very often "Modal". It means it has to be closed before to be able to use another Form.
WinForms provides different Dialogs:
- MessageBox
- FolderBrowser
- OpenFile
- SaveFile
- Etc...
Even your own Dialog is possible...
You can call a method to get a Dialog such as MessageBox.Show().
You also can create a Dialog from an instance and then modify some properties and use it by calling the method ".ShowDialog()".
MessageBox
Example 1:
string message = "Please select an item from the list box.";MessageBox.Show(message, "Important", MessageBoxButtons.OK, MessageBoxIcon.Warning);
Result:

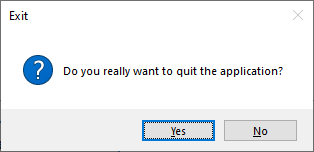
Example 2:
private void FormLifeCycleEventsForm_FormClosing(object sender, FormClosingEventArgs e){string message = "Do you really want to quit the application?";if (MessageBox.Show(message, "Exit", MessageBoxButtons.YesNo, MessageBoxIcon.Question) == DialogResult.No){e.Cancel = true;};}}
Info: e.Cancel allows to cancel the action of closing the Form.
Result:
Custom Dialogs
If you prefer to create your own custom Dialog instead of using a default ones, here is a way to do it!
- Create a standard Form
- Add 2 buttons:
- A "Yes" button with these properties:
- Text: &Yes (& = add the shortcut alt + Y to the button)
- Name: YesButton
- DialogResult: Yes
- A "No" button with these properties:
- Text: &No (& = add the shortcut alt + N to the button)
- Name: NoButton
- DialogResult: No
- A "Yes" button with these properties:
- Add a label "Do you want to quit?" to your Form
- Add a picture to make your custom dialog a bit lovelier
- Set the Form properties like that:
- FormBorderStyle: FixedDialog
- ControlBox: False
- MaximizeBox: False
- MinimizeBox: False
- AcceptButton: YesButton
- CancelButton: NoButton
Here is an example of what you could get:
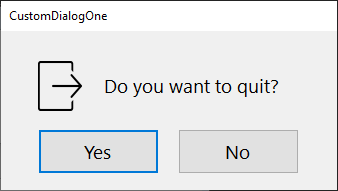
Now you have a "Custom Dialog" ready to be used! Cool, isn't it?
You wonder how to use it in a real world... Let's do it together.
Firstly, I create another Form, the main one.
Here is my main Form:
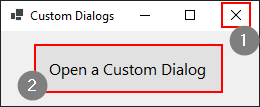
I can call my "Custom Dialog" by clicking on:
- The "cross (x)" to close the Form
private void CustomDialogsForm_FormClosing(object sender, FormClosingEventArgs e){CustomDialogOne customDialogOne = new();if (customDialogOne.ShowDialog() == DialogResult.No){e.Cancel = true;}}
- The button "Open a Custom Dialog"
private void CustomDialogOneButton_Click(object sender, EventArgs e){CustomDialogOne customDialogOne = new();customDialogOne.ShowDialog();if (customDialogOne.DialogResult == DialogResult.No){customDialogOne.Close();}if (customDialogOne.DialogResult == DialogResult.Yes){Application.ExitThread();}}
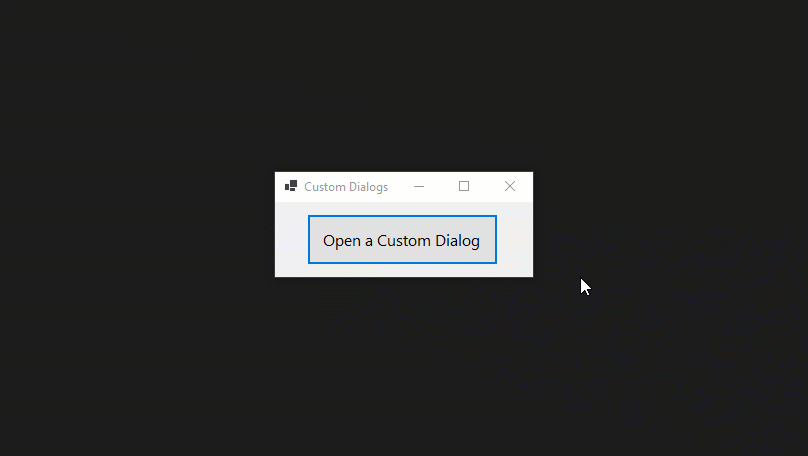
The result:
I hope you enjoyed this post and don't forget to keep coding!
Didier
Sources used
| Name | Link |
| Pluralsight - Windows Forms Best Practices by Mark Heath | Link |